DI-71x Ethernet Static Network Installation Problems and Resolutions for Windows 2000 and XP
On this Page
Symptoms
Cause
Resolution
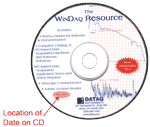
Verify that your WinDaq Resource CD is dated September 2005 or later
Verify that the IP address assigned to your DI-71x is not in use
Verify Firewall Settings
Create a Debug710.log file
Applies To
Symptoms
While installing WinDaq for your DI-71x Ethernet device to a static IP network you encounter the
following:
Upon selecting "Add IP" from the "No Devices Found" dialog box there is no MAC address listed in the "Manage IP Addresses" window.
Cause
This could be the result of one or more of the following:
Outdated installation software
The IP address assigned to the device is already in use
Conflicting firewall settings
Resolution
To resolve these issues follow the steps below.
Verify that your WinDaq Resource CD is dated September 2005 or later
If your WinDaq Resource CD is dated earlier than September 2005 download the latest revision of WinDaq at: www.dataq.com/support/upgrades/record/.
Run the WinDaq installation program. Did WinDaq install properly? If not proceed to the next step.
Verify that the IP address assigned to your DI-71x is not in use
Your DI-71x Ethernet device must be assigned a unique IP address. Consult with your network administrator to identify an available IP address.
Run the WinDaq installation program. Did WinDaq install properly? If not proceed to the next step.
Verify Windows firewall settings
You must be able to send and receive data over your local area network in order to install and run WinDaq for your DI-71x Ethernet device.
We require and use the following ports:
10001
30178
6237
68
67
These ports cannot be blocked for TCP or UDP. Check with your IT department to verify that network broadcasts are not blocked for these ports.
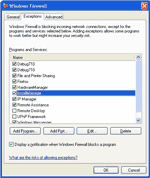
Also, make sure that your Windows firewall does not block the WinDaq Installation Manager.
- Double-click on "Security Center" in the Windows "Control Panel."
- Under "Manage security settings for:" select "Windows Firewall."

click on image to enlarge - Select the "Exceptions" tab from the "Windows Firewall" window and make sure that "InstallManager" is checked.

click on image to enlarge
Run the WinDaq installation program. Did WinDaq install properly? If not proceed to the next step.
Create a Debug710.log file
The Debug710.log file will provide information pertinent to your installation issue. The support staff at DATAQ Instruments will review the Debug710.log file and reply via phone or email with a solution.
- Right-click on the shortcut that you use to run the DATAQ Instruments Hardware Manager and select "Properties" (default is Start > Programs > WINDAQ > Dataq Instruments Hardware Manager).
- Add the word debug to the end of the "Target:" line.

click on image to enlarge - Run the DATAQ Instruments Hardware Manager. This will generate a debug710.log file in the directory where WinDaq is installed.
- Email the Debug710.log file along with a description of the problem to support@dataq.com.
Applies To
All DI-71x Ethernet devices being installed on a static IP network under Windows 2000 or XP.


 View Cart
 sales@dataq.com
 330-668-1444
