How to Activate WinDaq/XL
If you are looking for info about ExcelLink, please visit this page.
Once installed, WinDaq/XL must be activated in Microsoft Excel. Activations instructions differ based on which version of Excel you are using. Download the WinDaq/XL Help file to learn more about this software.
Please Note: WinDaq/XL is NOT compatible with 64-bit versions of Excel. To use 64-bit version of Excel, you need ExcelLink
Purchased copies of WinDaq/XL will come with a Product ID that can be entered during installation, or later in the Activation box that appears when you run WinDaq/XL. The Product ID is located on a sticker included with your hardware purchase or in an email sent when you order WinDaq/XL online. If you have any questions Submit a Support Ticket.
Microsoft Excel 2003 Instructions | Microsoft Excel 2007 Instructions | Microsoft Excel 2010 Instructions | Microsoft Excel 2013-2016 Instructions
Excel 2003 Instructions
- Go to the Tools menu in Excel and click on Add-Ins.
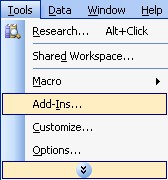
- Click on the WinDaq XL Option and Click OK.
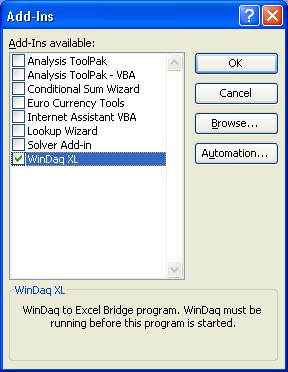
If WinDaq/XL is not available in this window you must find the program by using the Browse button. WinDaq/XL will be located in the folder specified during installation (default is C:\WinDaqXL\WinDaqXL.xla). - To begin using WinDaq/XL go to the Start command.
Once activated, you can access WinDaq/XL from the View > Add-ons menu item inWinDaqAcquisition software.
Note: WinDaq/XL is an add-in program to WinDaqSoftware and you must have WinDaq Acquisition running in order to stream data to Excel. To stream data in multiple instances (devices) you must run WinDaq with the first device then start WinDaq/XL; run WinDaq with the second device then start WinDaq/XL; etc.
Excel 2007 Instructions
- Click on the Microsoft Office button and click Excel Options.
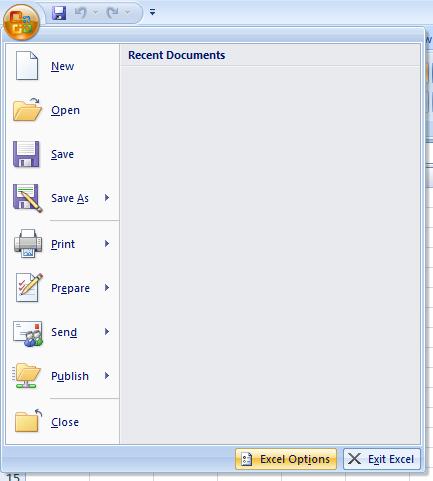
- Click on the Add-Ins Category.
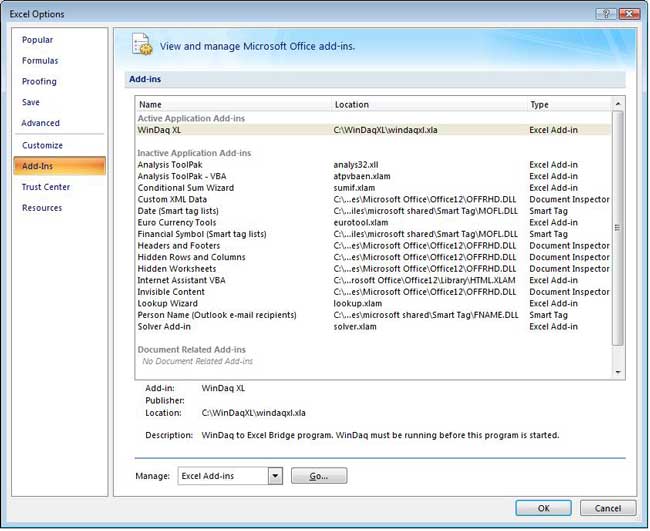
- Select Excel Add-Ins from the Manage: drop-down box.
- Click on the Go button.
- Click on the Browse button.
- Locate WinDaq/XL (default is C:\WinDaqXL\windaqxl.xla).
- In the Add-Ins available box, make sure the check box next to WinDaq/XL is checked.
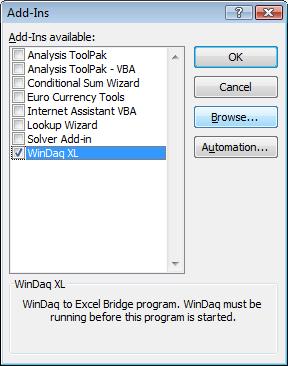
- Click OK.
Once activated, you can access WinDaq/XL from the View > Add-ons menu item in WinDaq Acquisition software.
Note: WinDaq/XL is an add-in program to WinDaqSoftware and you must have WinDaq Acquisition running in order to stream data to Excel. To stream data in multiple instances (devices) you must run WinDaq with the first device then start WinDaq/XL; run WinDaq with the second device then start WinDaq/XL; etc.
Excel 2010 Instructions
- Click on the File tab and click on Options (under Help).
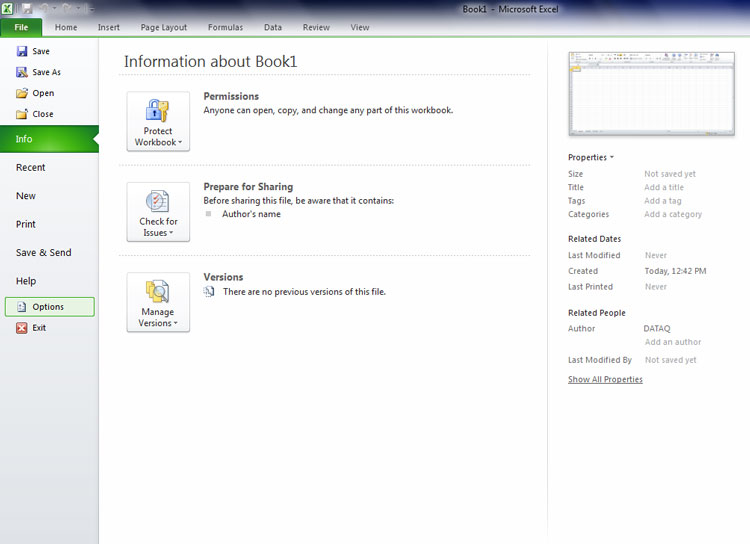
- In the Excel Options window select Add-Ins.
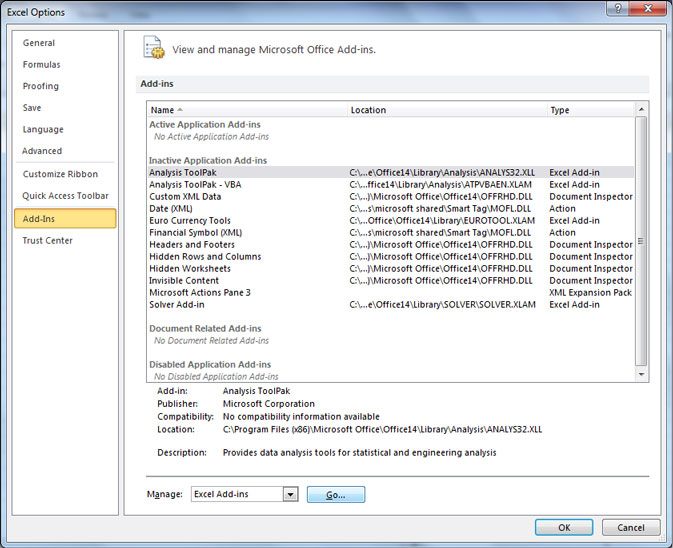
- Select Excel Add-Ins from the Manage: drop-down box.
- Click on the Go button.
- In the Add-Ins window click on the Browse button.
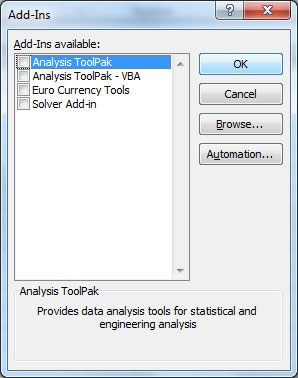
- Locate WinDaq/XL (default is C:\WinDaqXL\windaqxl.xla) and select it.
- In the Add-Ins window, make sure the check box next to WinDaq/XL is checked.
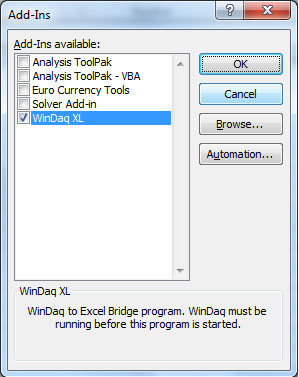
- Click OK.
Once activated, you can access WinDaq/XL from the View > Add-ons menu item in WinDaq Acquisition software.
Note: WinDaq/XL is an add-in program to WinDaqSoftware and you must have WinDaq Acquisition running in order to stream data to Excel.
Excel 2013-2016 Instructions
- Click on the File tab and click on Options.
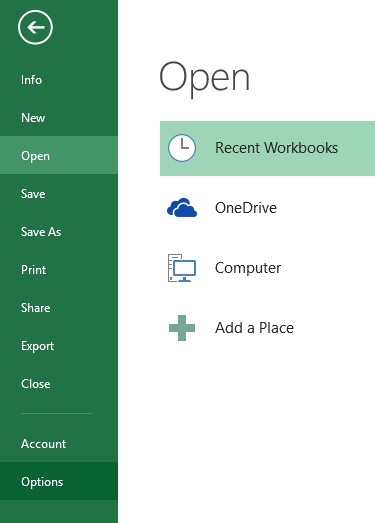
- In the Excel Options window select Add-Ins.

- Select Excel Add-Ins from the Manage: drop-down box.
- Click on the Go button.
- In the Add-Ins window click on the Browse button.

- Locate WinDaq/XL (default is C:\WinDaqXL\windaqxl.xla) and select it.
- In the Add-Ins window, make sure the check box next to WinDaq/XL is checked.

- Click OK.
Once activated, the Excel Add-Ins tab will appear in the ribbon. You can access the WinDaq/XL toolbar from the Excel Add-Ins tab or from the View > Add-ons menu item in WinDaq Acquisition software.
Note: WinDaq/XL is an add-in program to WinDaqSoftware and you must have WinDaq Acquisition running in order to stream data to Excel.


 View Cart
 sales@dataq.com
 330-668-1444